Advertisements
Advertisements
प्रश्न
उत्तर
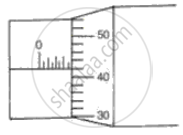
The following procedure is used to measure the diameter of a wire
(a). Calculate the least count and zero error of the screw gauge.
(b). Place the wire in between the studs. Turn the ratchet clockwise so as to hold the wire gently in between the studs. Record the main scale reading.
(c). Now record the division of circular scale that coincides with the base line of the main scale. This circular scale division multiplied by the least count will give circular scale reading.
(d). The observed diameter is obtained by adding the circular scale reading to the main scale reading. Subtract the zero error if any, with its proper sign, from the observed diameter to get the true diameter.
APPEARS IN
संबंधित प्रश्न
The wavelength of light of a particular colour is 5800 Å.
Express it in metre.
State three uses of the vernier callipers.
Define metre according to the old definition.
State the correction if the negative error is 7 divisions when the least count is 0.01 cm.
What do you understand by the following term as applied to screw gauge?
Negative zero error
What is the backlash error?
What is meant by the pitch of a screw gauge? The pitch of a screw is 1 mm.
Find the reading of the instrument shown in the following figure.

The following diagrams (Fig. 5) show the use of a vernier caliper under three different situations. Study the diagrams carefully and note down the vernier readings in each case.

(a) Measuring the diameter of the rod

(b) Measuring Internal diameter of a cavity

(c) Measuring depth of a cavity
State whether true or false. If false, correct the statement.
With the help of vernier caliper we can have an accuracy of 0.1 mm and with screw gauge we can have an accuracy of 0.01 mm.
