Advertisements
Advertisements
प्रश्न
How do you account for negative zero error, for calculating the correct diameter of wires?
उत्तर
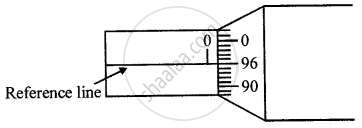
If the zero lines marked on a circular scale, is above the reference line of the main scale, then there is a negative error and the correction is positive.
In the figure, there is 96th division on the circular scale which coincides with the reference line.
∴ Correction = + [n − coinciding division of C.S. × L.C.]
where n is the total number of circular scale divisions.
∴ Correction = + [100 – 96] × 0.001 cm
= 0.004 cm
If observed diameter is 0.557 cm, then :
Corrected diameter
= Observed diameter + Correction
= 0. 557 cm + 0.004 cm
= 0.561 cm

APPEARS IN
संबंधित प्रश्न
State three uses of the vernier callipers.
The least count of a vernier calipers is :
The least count of a vernier callipers is 0.0025 cm and it has an error of + 0.0125 cm. While measuring the length of a cylinder, the reading on the main scale is 7.55 cm, and the 12th vernier scale division coincides with the main scale. Calculate the corrected length.
Define the term least count as applied to a vernier callipers.
State the correction if the positive error is 7 divisions when the least count is 0.01 cm.
What do you understand by the following term as applied to micrometre screw gauge?
Sleeve scale
The following diagrams (Fig. 5) show the use of a vernier caliper under three different situations. Study the diagrams carefully and note down the vernier readings in each case.

(a) Measuring the diameter of the rod

(b) Measuring Internal diameter of a cavity

(c) Measuring depth of a cavity
