Advertisements
Advertisements
प्रश्न
What do you mean by zero error of a screw gauge? How is it accounted for?
उत्तर १
Due to mechanical errors, sometimes when the anvil and spindle end are brought in contact, the zero mark of the circular scale does not coincide with the base line of main scale. It is either above or below the base line of the main scale, in which case the screw gauge is said to have a zero error. It can be both positive and negative.
It is accounted by subtracting the zero error (with sign) from the observed reading in order to get the correct reading.
Correct reading = Observed reading - zero error (with sign)
उत्तर २
If the zero of the circular scale does not coincide with the zero of the main scale (pitch scale), this is known as zero error. There are two types of zero error -
(a). If the zero of the circular scale remains below the line of graduation then it is called positive zero error
(b). If the zero of the circular scale lies above the line of graduation then it is called negative zero error
For positive zero error correction, the zero error should always be subtracted from the observed reading
For negative zero error correction, the zero error must be added to the observed reading.
APPEARS IN
संबंधित प्रश्न
Name the part of the vernier callipers which is used to measure the following
Depth of a small bottle
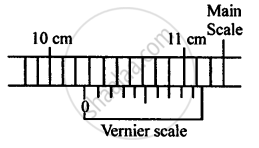
Figure shows the position of vernier scale while measuring the external length of a wooden cylinder.
- What is the length recorded by the main scale?

- Which reading of vernier scale coincides with the main scale?
- Calculate the length.
(a) A vernier scale has 20 divisions. It slides over the main scale, whose pitch is 0.5 mm. If the number of divisions on the left hand of the zero of vernier on the main scale is 38 and the 18th vernier scale division coincides with the main scale, calculate the diameter of the sphere, held in the jaws of vernier callipers.
(b) If the vernier has a negative error of 0.04 cm, calculate the corrected radius of the sphere.
A micrometre screw gauge has a positive zero error of 7 divisions, such that its main scale is marked in 1/2 mm and the circular scale has 100 divisions. The spindle of the screw advances by 1 division complete rotation.
If this screw gauge reading is 9 divisions on the main scale and 67 divisions on the circular scale for the diameter of a thin wire, calculate
- Pitch
- L.C.
- Observed diameter
- Corrected diameter
Name the measuring employed to measure the diameter of a pencil.
What is the least count in the case of the following instrument?
Screw gauge
What is the least count in the case of the following instrument?
Stopwatch
Thickness of a cricket ball is measured by ______.
