Advertisements
Advertisements
Question
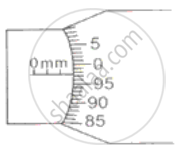
In the following figure, the pitch of the screw is 1 mm. Calculate:
(i) the least count of screw gauge and
(ii) the reading represented in the figure.

Solution
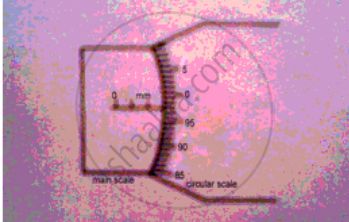
Screw gauge in the figure
(i) Pitch of the screw = 1 mm

Divisions on circular scale= 100
least count = pitch of the screw/ divisions on the main scale
L.C. = 1/100 = 0.01 mm= 0.001 cm
(ii) LC. = 0.001 cm
the main scale reading = 2 mm= 0.2 cm
from the figure it is clear that base line coincides with the 97th division of the circular scale.
So, circular scale reading= 97 X 0.001 cm = 0.097 cm Hence, reading shown In the figure= 0.2 + 0.097 = 0.297 cm
APPEARS IN
RELATED QUESTIONS
A vernier callipers has its main scale graduated in mm and 10 divisions on its vernier scale are equal in length to 9 mm. When the two jaws are in contact, the zero of the vernier scale is ahead of the zero of the main scale and the 3rd division of the vernier
scale coincides with a main scale division.
Find : (i) The least count and
(ii) The zero error of the vernier callipers.
Why is the metre length in terms of the wavelength of light considered more accurate?
A micrometre screw gauge having a positive zero error of 5 divisions is used to measure diameter of a wire, when reading on the main scale is 3rd division and the 48th circular scale division coincides with baseline. If the micrometer has 10 divisions to a centimetre on the main scale and 100 divisions on a circular scale, calculate
- Pitch of screw
- Least count of screw
- Observed diameter
- Corrected diameter.
What do you understand by the term least count of screw?
Name the measuring employed to measure the thickness of a paper.
The main scale reading while measuring the thickness of a rubber ball using Vernier caliper is 7 cm and the Vernier scale coincidence is 6. Find the radius of the ball.
