Advertisements
Advertisements
Question
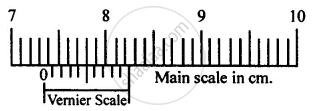
In figure for vernier callipers, calculate the length recorded.

Solution
Main scale divisions of vernier callipers in one centimetre = 10
Pitch = `"Unit of main scale"/"Number of divisions in the unit"`
= `1/10` cm = 0.1 cm
Least count (L.C.) = `"Pitch"/"No. of divisions on the vernier scale"`
L.C. = `0.1/10` cm = 0.01 cm
Here main scale reading = 7.3 cm
Vernier scale reading (V.S.D.) coinciding with main scale = 5th
Length recorded = Main scale reading + L.C. × V.S.D.
= 7.3 + 0.01 × 5
= 7.3 + 0.05
= 7.35 cm
APPEARS IN
RELATED QUESTIONS
The pitch of a screw gauge is 0.5 mm and the head scale is divided in 100 parts. What is the least count of a screw gauge?
Is it possible to increase the degree of accuracy by mathematical manipulations? Support your answer by an example.
The least count of a vernier callipers is 0.0025 cm and it has an error of + 0.0125 cm. While measuring the length of a cylinder, the reading on the main scale is 7.55 cm, and the 12th vernier scale division coincides with the main scale. Calculate the corrected length.
A micrometre screw gauge has a negative zero error of 7 divisions. While measuring the diameter of a wire the reading on the main scale is 2 divisions and 79th circular scale division coincides with baseline.
If the number of divisions on the main scale is 10 to a centimetre and circular scale has 100 divisions, calculate
- pitch
- observed diameter
- least count
- corrected diameter.
How do you account for negative zero error, for calculating the correct diameter of wires?
Name the measuring employed to measure the thickness of a paper.
Least count of a vernier caliper is ______ cm.
The precision of vernier calipers is ______ mm.
