Advertisements
Advertisements
Question
The following diagrams (Fig. 5) show the use of a vernier caliper under three different situations. Study the diagrams carefully and note down the vernier readings in each case.

(a) Measuring the diameter of the rod

(b) Measuring Internal diameter of a cavity

(c) Measuring depth of a cavity
Solution

(a) Measuring the diameter of the rod

(b) Measuring Internal diameter of a cavity

(c) Measuring the depth of a cavity
Least count of vernier caliper = 0.01 cm
(i) Main scale reading = 5.5 cm
Vernier scale division coinciding with main scale = 6 Vernier scale reading = 6 × 0.01 cm = 0.06 cm
Diameter of rod = 5.5 + 0.06 = 5.56 cm
(ii) Main scale reading = 1.6 cm
Vernier scale division coinciding with main scale = 5
Vernier scale reading = 5 × 0.01 cm = 0.05 cm
Internal diameter of a cavity = 1.6 + 0.05 = 1.65 cm
(iii) Main scale reading = 3.1 cm
Vernier scale division coinciding with main scale = 5 Vernier scale reading = 5 × 0.01 cm = 0.05 cm
Depth of a cavity = 3.1 + 0.05 = 3.15 cm
APPEARS IN
RELATED QUESTIONS
Define the least count of vernier callipers. How do you determine it?
State one use of a screw gauge.
Is it possible to increase the degree of accuracy by mathematical manipulations? Support your answer by an example.
State the formula for calculating length if:
Number of vernier scale division coinciding with the main scale and number of division of main scale on the left-hand side of zero of vernier scale is known.
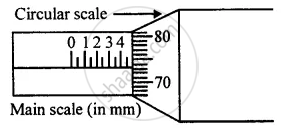
Figure shows a screw gauge in which circular scale has 100 divisions. Calculate the least count and the diameter of a wire.

What do you understand by the following term as applied to micrometre screw gauge?
Thimble scale
State the formula for calculating the pitch of screw.
How will you measure the least count of vernier caliper?
