Topics
Physical World and Measurement
Physical World
Units and Measurements
- International System of Units
- Measurement of Length
- Measurement of Mass
- Measurement of Time
- Accuracy, Precision and Least Count of Measuring Instruments
- Errors in Measurements
- Significant Figures
- Dimensions of Physical Quantities
- Dimensional Formulae and Dimensional Equations
- Dimensional Analysis and Its Applications
- Need for Measurement
- Units of Measurement
- Fundamental and Derived Units
- Length, Mass and Time Measurements
- Introduction of Units and Measurements
Motion in a Straight Line
- Position, Path Length and Displacement
- Average Velocity and Average Speed
- Instantaneous Velocity and Speed
- Kinematic Equations for Uniformly Accelerated Motion
- Acceleration (Average and Instantaneous)
- Relative Velocity
- Elementary Concept of Differentiation and Integration for Describing Motion
- Uniform and Non-uniform Motion
- Uniformly Accelerated Motion
- Position-time, Velocity-time and Acceleration-time Graphs
- Position - Time Graph
- Relations for Uniformly Accelerated Motion (Graphical Treatment)
- Introduction of Motion in One Dimension
- Motion in a Straight Line
Kinematics
Motion in a Plane
- Scalars and Vectors
- Multiplication of Vectors by a Real Number or Scalar
- Addition and Subtraction of Vectors - Graphical Method
- Resolution of Vectors
- Vector Addition – Analytical Method
- Motion in a Plane
- Motion in a Plane with Constant Acceleration
- Projectile Motion
- Uniform Circular Motion (UCM)
- General Vectors and Their Notations
- Motion in a Plane - Average Velocity and Instantaneous Velocity
- Rectangular Components
- Scalar (Dot) and Vector (Cross) Product of Vectors
- Relative Velocity in Two Dimensions
- Cases of Uniform Velocity
- Cases of Uniform Acceleration Projectile Motion
- Motion in a Plane - Average Acceleration and Instantaneous Acceleration
- Angular Velocity
- Introduction of Motion in One Dimension
Laws of Motion
Work, Energy and Power
Laws of Motion
- Aristotle’s Fallacy
- The Law of Inertia
- Newton's First Law of Motion
- Newton’s Second Law of Motion
- Newton's Third Law of Motion
- Conservation of Momentum
- Equilibrium of a Particle
- Common Forces in Mechanics
- Circular Motion and Its Characteristics
- Solving Problems in Mechanics
- Static and Kinetic Friction
- Laws of Friction
- Inertia
- Intuitive Concept of Force
- Dynamics of Uniform Circular Motion - Centripetal Force
- Examples of Circular Motion (Vehicle on a Level Circular Road, Vehicle on a Banked Road)
- Lubrication - (Laws of Motion)
- Law of Conservation of Linear Momentum and Its Applications
- Rolling Friction
- Introduction of Motion in One Dimension
Work, Energy and Power
- Introduction of Work, Energy and Power
- Notions of Work and Kinetic Energy: the Work-energy Theorem
- Kinetic Energy (K)
- Work Done by a Constant Force and a Variable Force
- Concept of Work
- Potential Energy (U)
- Conservation of Mechanical Energy
- Potential Energy of a Spring
- Various Forms of Energy : the Law of Conservation of Energy
- Power
- Collisions
- Non - Conservative Forces - Motion in a Vertical Circle
Motion of System of Particles and Rigid Body
System of Particles and Rotational Motion
- Motion - Rigid Body
- Centre of Mass
- Motion of Centre of Mass
- Linear Momentum of a System of Particles
- Vector Product of Two Vectors
- Angular Velocity and Its Relation with Linear Velocity
- Torque and Angular Momentum
- Equilibrium of Rigid Body
- Moment of Inertia
- Theorems of Perpendicular and Parallel Axes
- Kinematics of Rotational Motion About a Fixed Axis
- Dynamics of Rotational Motion About a Fixed Axis
- Angular Momentum in Case of Rotation About a Fixed Axis
- Rolling Motion
- Momentum Conservation and Centre of Mass Motion
- Centre of Mass of a Rigid Body
- Centre of Mass of a Uniform Rod
- Rigid Body Rotation
- Equations of Rotational Motion
- Comparison of Linear and Rotational Motions
- Values of Moments of Inertia for Simple Geometrical Objects (No Derivation)
Gravitation
Gravitation
- Kepler’s Laws
- Newton’s Universal Law of Gravitation
- The Gravitational Constant
- Acceleration Due to Gravity of the Earth
- Acceleration Due to Gravity Below and Above the Earth's Surface
- Acceleration Due to Gravity and Its Variation with Altitude and Depth
- Gravitational Potential Energy
- Escape Speed
- Earth Satellites
- Energy of an Orbiting Satellite
- Geostationary and Polar Satellites
- Weightlessness
- Escape Velocity
- Orbital Velocity of a Satellite
Properties of Bulk Matter
Mechanical Properties of Solids
- Elastic Behaviour of Solid
- Stress and Strain
- Hooke’s Law
- Stress-strain Curve
- Young’s Modulus
- Determination of Young’s Modulus of the Material of a Wire
- Shear Modulus or Modulus of Rigidity
- Bulk Modulus
- Application of Elastic Behaviour of Materials
- Elastic Energy
- Poisson’s Ratio
Thermodynamics
Behaviour of Perfect Gases and Kinetic Theory of Gases
Mechanical Properties of Fluids
- Thrust and Pressure
- Pascal’s Law
- Variation of Pressure with Depth
- Atmospheric Pressure and Gauge Pressure
- Hydraulic Machines
- Streamline and Turbulent Flow
- Applications of Bernoulli’s Equation
- Viscous Force or Viscosity
- Reynold's Number
- Surface Tension
- Effect of Gravity on Fluid Pressure
- Terminal Velocity
- Critical Velocity
- Excess of Pressure Across a Curved Surface
- Introduction of Mechanical Properties of Fluids
- Archimedes' Principle
- Stoke's Law
- Equation of Continuity
- Torricelli's Law
Oscillations and Waves
Thermal Properties of Matter
- Heat and Temperature
- Measurement of Temperature
- Ideal-gas Equation and Absolute Temperature
- Thermal Expansion
- Specific Heat Capacity
- Calorimetry
- Change of State - Latent Heat Capacity
- Conduction
- Convection
- Radiation
- Newton’s Law of Cooling
- Qualitative Ideas of Black Body Radiation
- Wien's Displacement Law
- Stefan's Law
- Anomalous Expansion of Water
- Liquids and Gases
- Thermal Expansion of Solids
- Green House Effect
Thermodynamics
- Thermal Equilibrium
- Zeroth Law of Thermodynamics
- Heat, Internal Energy and Work
- First Law of Thermodynamics
- Specific Heat Capacity
- Thermodynamic State Variables and Equation of State
- Thermodynamic Process
- Heat Engine
- Refrigerators and Heat Pumps
- Second Law of Thermodynamics
- Reversible and Irreversible Processes
- Carnot Engine
Kinetic Theory
- Molecular Nature of Matter
- Gases and Its Characteristics
- Equation of State of a Perfect Gas
- Work Done in Compressing a Gas
- Introduction of Kinetic Theory of an Ideal Gas
- Interpretation of Temperature in Kinetic Theory
- Law of Equipartition of Energy
- Specific Heat Capacities - Gases
- Mean Free Path
- Kinetic Theory of Gases - Concept of Pressure
- Assumptions of Kinetic Theory of Gases
- RMS Speed of Gas Molecules
- Degrees of Freedom
- Avogadro's Number
Oscillations
- Periodic and Oscillatory Motion
- Simple Harmonic Motion (S.H.M.)
- Simple Harmonic Motion and Uniform Circular Motion
- Velocity and Acceleration in Simple Harmonic Motion
- Force Law for Simple Harmonic Motion
- Energy in Simple Harmonic Motion
- Some Systems Executing Simple Harmonic Motion
- Damped Simple Harmonic Motion
- Forced Oscillations and Resonance
- Displacement as a Function of Time
- Periodic Functions
- Oscillations - Frequency
- Simple Pendulum
Waves
- Reflection of Transverse and Longitudinal Waves
- Displacement Relation for a Progressive Wave
- The Speed of a Travelling Wave
- Principle of Superposition of Waves
- Introduction of Reflection of Waves
- Standing Waves and Normal Modes
- Beats
- Doppler Effect
- Wave Motion
- Speed of Wave Motion
- Accuracy of measuring instruments
- Precision of measuring instruments
- Least count for various instruments
- Zero error: Negative and Positive zero error
Accuracy, Precision of Instruments and Errors in Measurements
Measurement is the foundation of all experimental science and technology. The result of every measurement by any measuring instrument contains some uncertainty. This uncertainty is called error. Every calculated quantity, which is based on measured values, also has an error.
Accuracy: The accuracy of a measurement is a measure of how close the measured value is to the true value of the quantity.
Precision: Precision tells us to what resolution or limit the quantity is measured.
For example:- If the true value of a certain length is 3.678 cm and two instruments with different resolutions, up to 1 (less precise) and 2 (more precise) decimal places respectively, are used. If the first measures the length as 3.5 and the second as 3.38 then the first has more accuracy but less precision while the second has less accuracy and more precision.
Thus, every measurement is approximate due to errors in measurement.
In general, the errors in measurement can be broadly classified as follows:-
(a) Systematic errors
(b) Random errors.
Systematic Error
Systematic errors are those errors that tend to be in one direction, either positive or negative. Errors due to buoyancy in weighting and radiation loss in calorimetry are systematic errors. They can be eliminated by manipulation. Some of the sources of systematic errors are
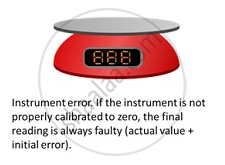
1. Instrument errors: These arise from imperfect design or calibration errors in the instrument. Worn off scale, and zero error in a weighing scale are some examples of instrument errors.

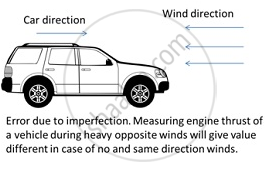
2. Imperfections in experimental techniques: If the technique is not accurate (for example, measuring the temperature of the human body by placing a thermometer under the armpit resulting in a lower temperature than actual) and due to external conditions like temperature, wind, and humidity, these kinds of errors occur.

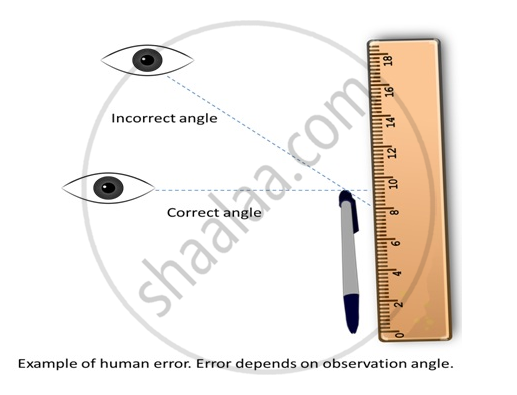
3. Personal errors: Errors occurring due to human carelessness, lack of proper setting, or taking down incorrect reading are called personal errors

These errors can be removed by:
-
Taking proper instruments and calibrating them properly.
Experimenting under proper atmospheric conditions and techniques.
Random errors
- Errors that occur at random with respect to sign and size are called Random errors.
- These occur due to unpredictable fluctuations in experimental conditions like temperature, voltage supply, mechanical vibrations, personal errors etc.
Least Count Error
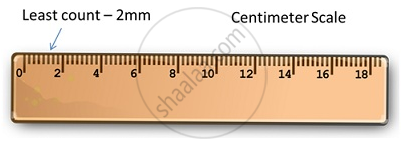
The smallest value that can be measured by the measuring instrument is called its least count. The least count error is the error associated with the resolution or the least count of the instrument.
-
Least count errors can be minimized by using instruments of higher precision/resolution and improving experimental techniques (taking several readings of a measurement and then taking a mean).
-
Least count error belongs to the category of random errors, but within a limited size; it occurs with both systematic and random errors.
For example, a vernier calliper has the least count of 0.01cm; a spherometer may have the least count of 0.001 cm.

Absolute Error, Relative Error and Percentage Error
Absolute Error:-
If a1,a2,a3,...., an be the measured values of a quantity in several measurements, then their mean is considered to be the true values of that quantity i.e.,
true value a0 = amean = `[a_1 + a_2 + a_3 + ... +a_n ]/[n]`
The magnitude of the difference between the true value of the quantity and the individual measurement value is the absolute error of that measurement. Hence, absolute errors in measured values are:
`Δa_1 = a_0 - a_1, Δa_2 = a_0 - a_2, Δa_3 = a_0 - a_3, ..........Δa_n = a_0 - a_n`
The arithmetic mean(i.e., the mean of the magnitudes) of all the absolute errors is known as the mean absolute error.
Δamean = `[|Δa_1| + |Δa_2| + |Δa_3| + ......+ |Δa_n|]/[n]`
Relative Error:-
The ratio between the mean absolute error and the mean values is called relative error
Relative error = `"Mean absolute error"/"Mean value"`
= `(triangle "a"_"mean")/("a"_"mean")` = `(triangle "a"_"mean")/("a"_"0")`
Percentage Error:-
Percentage Error is the expression of the relative error in percentage.
Percentage Error = `(triangle "a"_"mean")/("a"_"mean") ` × 100%
Combination of errors
If a quantity depends on two or more other quantities, the combination of errors in the two quantities helps to determine and predict the errors in the resultant quantity. There are several procedures for this.
Suppose two quantities A and B have values as A ± ΔA and B ± ΔB. Z is the result and ΔZ is the error due to the combination of A and B.
| Criteria | Sum or Difference | Product | Raised to Power |
| Resultant value Z | `Z=A+-B` | `Z=AB` | `Z= A^k` |
| Result with error | `Z+- ΔZ=(A+-ΔA)+(B+-ΔB)` | `Z+- ΔZ=(A+-ΔA)(B+-ΔB)` | `Z+- ΔZ=(A+-ΔA)^k` |
| Resultant error range | `+- ΔZ=+-ΔA+-ΔB` | `(ΔZ)/Z=(ΔA)/A+-(ΔB)/B` | |
| Maximum error | `ΔZ=ΔA +ΔB` | `(ΔZ)/Z=(ΔA)/A+(ΔB)/B` | `(ΔZ)/Z=k((ΔA)/A)` |
| Error | Sum of absolute errors | Sum of relative errors | k times relative error |
